I respect you guys on this board and your advice, so at the risk of being beaten up for asking, can anyone tell me about - advise me - about venting the 1st valve on my rotary CC? There was a little discussion about this on the "other" board, but of course many of those posts are missing. I use the 1st valve slide constantly for tuning while playing and get really annoyed with the "pop" that comes with the next note. If it is feasible, can anyone describe the procedure in some detail? I have a good repairman, but I don't want him boring a hole in the wrong place. I would just like to have smoother playing without loss of sound quality. Thanks.
My repair guy is looking into this thing, thinking it might do the job: https://thejoykey.com/
Venting rotary valve?
Forum rules
This section is for posts that are directly related to performance, performers, or equipment. Social issues are allowed, as long as they are directly related to those categories. If you see a post that you cannot respond to with respect and courtesy, we ask that you do not respond at all.
This section is for posts that are directly related to performance, performers, or equipment. Social issues are allowed, as long as they are directly related to those categories. If you see a post that you cannot respond to with respect and courtesy, we ask that you do not respond at all.
-
Jperry1466

- Posts: 410
- Joined: Thu Aug 13, 2020 8:13 am
- Location: near Fort Worth, Texas
- Has thanked: 330 times
- Been thanked: 129 times
-
matt g
- Posts: 2601
- Joined: Thu Aug 13, 2020 10:37 am
- Location: Southeastern New England
- Has thanked: 269 times
- Been thanked: 559 times
Re: Venting rotary valve?
Rotary valve venting is a pretty straightforward procedure. The vent is simply placed between the two knuckles on the added tubing side of the valve. For example, on a typical Mirafone, if you’re looking at the horn from the front, the vents would be on the left side of the valves, opposite the side where the open bugle passes through.
Dillon/Walters CC (sold)
Meinl-Weston 2165 (sold)
Meinl-Weston 2165 (sold)
-
Jperry1466
- Posts: 410
- Joined: Thu Aug 13, 2020 8:13 am
- Location: near Fort Worth, Texas
- Has thanked: 330 times
- Been thanked: 129 times
Re: Venting rotary valve?
What is the size of the hole? A pinhole? Thanks.matt g wrote: ↑Fri Dec 18, 2020 10:08 pm Rotary valve venting is a pretty straightforward procedure. The vent is simply placed between the two knuckles on the added tubing side of the valve. For example, on a typical Mirafone, if you’re looking at the horn from the front, the vents would be on the left side of the valves, opposite the side where the open bugle passes through.
-
matt g
- Posts: 2601
- Joined: Thu Aug 13, 2020 10:37 am
- Location: Southeastern New England
- Has thanked: 269 times
- Been thanked: 559 times
Re: Venting rotary valve?
It’s usually pretty darn small. I couldn’t give you and exact measure. I had a 188 that had all five valves vented. The prior owner let a little bit of lime build up and it was enough to clog them. So yeah, pretty tiny.
Dillon/Walters CC (sold)
Meinl-Weston 2165 (sold)
Meinl-Weston 2165 (sold)
-
Jperry1466
- Posts: 410
- Joined: Thu Aug 13, 2020 8:13 am
- Location: near Fort Worth, Texas
- Has thanked: 330 times
- Been thanked: 129 times
-
tbonesullivan

- Posts: 29
- Joined: Thu Aug 13, 2020 10:31 am
- Location: New Jersey
- Has thanked: 0
- Been thanked: 0
Re: Venting rotary valve?
Make sure you take it to an experienced tech who will make sure the vent is done right, with the right size as well as not deforming the casing.
Yamaha YBB-631S BBb Tuba, B&H Imperial Eb Tuba, Sterling / Perantucci 1065GHS Euphonium
Yamaha YBL-612 RII & YBL-613H Bass Trombones and a bunch of other trombones
Yamaha YBL-612 RII & YBL-613H Bass Trombones and a bunch of other trombones
-
the elephant

- Posts: 3778
- Joined: Thu Aug 13, 2020 8:39 am
- Location: Yazoo City, Mississippi (stop laughing!)
- Has thanked: 2187 times
- Been thanked: 1586 times
Re: Venting rotary valve?
In my world, there are two kinds of vents for rotary valves.
You have an equalization vent that removes the slight popping that happens on most valves in (for me) colder conditions. This only needs to be a very small hole as very small amounts of air pass in either direction.
The other one is for slides where you need to suck in or press out a LOT of air very quickly to fully remove compression on the "dead" side of the rotor.
For the first type, I use a very small drill from a Drill Index — the #40, which in my cheapo Index set is the smallest one. This is all you need unless you intend to pump lots of air through the hole through large, frequent slide pulls or pushes. If you do try to move a lot of air through such a small hole it will "wheeze" fairly loudly and probably will still give you a slight "pop" feeling as it can't really move all that air through the hole in time before you have depressed the valve.
For the other type, I use THREE inline holes using a #37 drill. These are about 75% larger (uh, maybe less — a 37 is still very small) which allows a lot more air to flow through very quickly. For a 1st valve slide that is fairly short, it is usually enough. There is no "wheezing" when you quickly move the slide from one extreme to another. Some people place a large hole in this spot, but this is a mistake.
The "butterfly valve" in a tuba's rotary valve is a narrow wall that fits between the two valve ports, and in truth is actually about 30% narrower inside the casing than outside, due to the way the ports are chamfered inside to mate up with the rotor.
This has the effect of forcing perfect technique, to include never, ever "riding the clutch" (meaning just barely having the valve rotated while working other valves, which is actually a common technique fault for some players, and a messed up vent like this will wreak havoc on them). If you have a large hole to allow enough air to move it can also end up leaking if the bumpers are not perfectly aligned, as that large hole can come right up to the chamfered edge on the inside of the casing that you cannot usually see. If you then go on to use a larger drill to make your larger hole and you accidentally place it even so much as half of a millimeter off-center the valve can be ruined unless you braze it shut (or fill it with soft solder or Play-Doh or whatever). If you mark your center with a punch you can easily bend the casing and ruin the valve.
The trick is to use as small a drill as you can while making more holes that are very well centered between the two knuckles. AND (most important) they must be centered between the ports INSIDE the valve, which is difficult to do.
Once you have had the holes drilled the inside of the casing must be deburred, but deburring in that spot can cause a leak, too.
It is something you need to pay a lot for, to a tech who has done it many times. It is an easy way to badly mar a nice horn, or create a leak you are not aware of for some time and then have to go back to pay them to address it (or have it fixed on warranty — if that is available to you).
I hope this helps explain what is going on when a vent is created, and what to try and avoid if having it done.
Here are some photos for you to consider…
This is the set of five brand new valves I installed to my 1971 Mirafone 186 CC tuba. I have just vented, deburred, and reassembled them to check for leaks. They are in the order they will be on the horn: 5, 1, 2, 3, and 4…

These are the first type that only really allows for pressure equalization. It actually makes a nice difference on some horns, but on others (with older, leakier valves) this is a waste of money. These valves are brand new, though, and the vents will be a nice thing to have.

See, these use a larger #37 drill. The up-down locations of each hole just need to be within what is obviously an okay zone. The right-left locations are critical, though. Very important! I typically drill while looking into the casing at the same time so I can control where the hole opens up inside.

Here are two valves from my other CC 186. I had forgotten that I wanted to use the #40 drill on all the valves except for 1st, so these all were cut using the #37 drill. Whoops. It's not like the world will end. Anyway, you can see which one is my 1st valve, obviously. I vented this set first as a long practice session before I vented all five unused valves for the other 186. I had not vented a valve in many years, so I started with a ruined casing, moved to the five of this set, and then to the five new ones.

Here is a very poorly vented valve. The hole is huge, and it is pretty off-center, too. The dark line to the right is open space — a GIANT LEAK. If the bumper degraded to this point which is where it was exactly when I got this valve) the hiss out of it would be constant as you tried hard to fill the tuba AND the room as you exhaled into the mouthpiece. This is why I use three small holes in a very narrow line. More air can flow, the chances of a weak due to poor valve technique or worn bumpers are much less, and the asthmatic wheeze of a single, small hole is eliminated.

You have an equalization vent that removes the slight popping that happens on most valves in (for me) colder conditions. This only needs to be a very small hole as very small amounts of air pass in either direction.
The other one is for slides where you need to suck in or press out a LOT of air very quickly to fully remove compression on the "dead" side of the rotor.
For the first type, I use a very small drill from a Drill Index — the #40, which in my cheapo Index set is the smallest one. This is all you need unless you intend to pump lots of air through the hole through large, frequent slide pulls or pushes. If you do try to move a lot of air through such a small hole it will "wheeze" fairly loudly and probably will still give you a slight "pop" feeling as it can't really move all that air through the hole in time before you have depressed the valve.
For the other type, I use THREE inline holes using a #37 drill. These are about 75% larger (uh, maybe less — a 37 is still very small) which allows a lot more air to flow through very quickly. For a 1st valve slide that is fairly short, it is usually enough. There is no "wheezing" when you quickly move the slide from one extreme to another. Some people place a large hole in this spot, but this is a mistake.
The "butterfly valve" in a tuba's rotary valve is a narrow wall that fits between the two valve ports, and in truth is actually about 30% narrower inside the casing than outside, due to the way the ports are chamfered inside to mate up with the rotor.
This has the effect of forcing perfect technique, to include never, ever "riding the clutch" (meaning just barely having the valve rotated while working other valves, which is actually a common technique fault for some players, and a messed up vent like this will wreak havoc on them). If you have a large hole to allow enough air to move it can also end up leaking if the bumpers are not perfectly aligned, as that large hole can come right up to the chamfered edge on the inside of the casing that you cannot usually see. If you then go on to use a larger drill to make your larger hole and you accidentally place it even so much as half of a millimeter off-center the valve can be ruined unless you braze it shut (or fill it with soft solder or Play-Doh or whatever). If you mark your center with a punch you can easily bend the casing and ruin the valve.
The trick is to use as small a drill as you can while making more holes that are very well centered between the two knuckles. AND (most important) they must be centered between the ports INSIDE the valve, which is difficult to do.
Once you have had the holes drilled the inside of the casing must be deburred, but deburring in that spot can cause a leak, too.
It is something you need to pay a lot for, to a tech who has done it many times. It is an easy way to badly mar a nice horn, or create a leak you are not aware of for some time and then have to go back to pay them to address it (or have it fixed on warranty — if that is available to you).
I hope this helps explain what is going on when a vent is created, and what to try and avoid if having it done.
Here are some photos for you to consider…
This is the set of five brand new valves I installed to my 1971 Mirafone 186 CC tuba. I have just vented, deburred, and reassembled them to check for leaks. They are in the order they will be on the horn: 5, 1, 2, 3, and 4…
These are the first type that only really allows for pressure equalization. It actually makes a nice difference on some horns, but on others (with older, leakier valves) this is a waste of money. These valves are brand new, though, and the vents will be a nice thing to have.
See, these use a larger #37 drill. The up-down locations of each hole just need to be within what is obviously an okay zone. The right-left locations are critical, though. Very important! I typically drill while looking into the casing at the same time so I can control where the hole opens up inside.
Here are two valves from my other CC 186. I had forgotten that I wanted to use the #40 drill on all the valves except for 1st, so these all were cut using the #37 drill. Whoops. It's not like the world will end. Anyway, you can see which one is my 1st valve, obviously. I vented this set first as a long practice session before I vented all five unused valves for the other 186. I had not vented a valve in many years, so I started with a ruined casing, moved to the five of this set, and then to the five new ones.
Here is a very poorly vented valve. The hole is huge, and it is pretty off-center, too. The dark line to the right is open space — a GIANT LEAK. If the bumper degraded to this point which is where it was exactly when I got this valve) the hiss out of it would be constant as you tried hard to fill the tuba AND the room as you exhaled into the mouthpiece. This is why I use three small holes in a very narrow line. More air can flow, the chances of a weak due to poor valve technique or worn bumpers are much less, and the asthmatic wheeze of a single, small hole is eliminated.

-
Jperry1466
- Posts: 410
- Joined: Thu Aug 13, 2020 8:13 am
- Location: near Fort Worth, Texas
- Has thanked: 330 times
- Been thanked: 129 times
Re: Venting rotary valve?
Thanks! That is very helpful.the elephant wrote: ↑Sat Dec 19, 2020 10:44 pm In my world, there are two kinds of vents for rotary valves.
Here are some photos for you to consider…
-
LibraryMark
- Posts: 111
- Joined: Thu Aug 13, 2020 3:37 pm
- Has thanked: 72 times
- Been thanked: 23 times
-
matt g
- Posts: 2601
- Joined: Thu Aug 13, 2020 10:37 am
- Location: Southeastern New England
- Has thanked: 269 times
- Been thanked: 559 times
Re: Venting rotary valve?
@the elephant, thanks for those photos.
My 188 was vented like those small single holes in your first photo. They did wheeze a little, but it wasn’t really noticeable. All five of mine were vented when I only needed to move first most of the time.
I believe venting can be done with the casings in place, but it’s a higher risk.
Edit:
Wade, your stacked holes idea got me to thinking. If a tech were to drill the upper and lower holes only, they could use a slightly larger bit while minimizing risk of leak due to the curvature of the valve ports. The single point dead on center is the highest risk. Using the poorly vented valve as an example, if the vent could be moved to where it’s aligned just inside the valve knuckle, there would be no leak in the photo you have there since the valve port would’ve curved away at that point.
Edit 2:
This photo shows, in the red highlighted areas, where that larger port could’ve been a bit off center (not to the extent of the highlights, they are just there for alignment purposes) and not created a leak with a degraded bumper.
Dillon/Walters CC (sold)
Meinl-Weston 2165 (sold)
Meinl-Weston 2165 (sold)
-
the elephant
- Posts: 3778
- Joined: Thu Aug 13, 2020 8:39 am
- Location: Yazoo City, Mississippi (stop laughing!)
- Has thanked: 2187 times
- Been thanked: 1586 times
Re: Venting rotary valve?
Every maker routes their slides differently. Even the more or less standard routing of 1st is a bit different on some horns, like the MW 32.LibraryMark wrote: ↑Sun Dec 20, 2020 9:02 amSo venting can only be done when the valve casings are out of the horn?
If a tech can assure the hole breaks through the inside face of the casing exactly between the ports then you are good. This can be really tricky, though. I use a set of 12" aircraft length twist drills, which work well in brass and do not flex too much, so they are controllable. I keep like four of each of my preferred sizes in stock because at this length and thinness they still will want to fold in half on you. It is a slow, painstaking process to drill these holes and clean them up if the valves are assembled to the tuba. I normally do this work for people when it involves removing the valve casing or any of the tubes that block access.
If you can get the hole centered right-to-left and running perpendicular to the casing face, if the hole travels through the casing at a slight down angle it is okay. You have nearly a half-inch of room to work with inside that plane, but only like a millimeter in the other plane. Keep in mind that if this is done with the valves on the horn that you *must* take into account the slide runners that will block your work. Again, this is PITA work that needs to be done by someone with a lot of experience or your tuba could be wrecked.
On a Mirafone 18x series valve section, the tubing runners are laid out like this, and you can see how a 12" aircraft drill bit would be blocked unless some parts are removed. You *can* flex these as they are very thin, so you can hold them in place with a finger to the blocking tube and then flex them a little to clear it and also hit your mark on the casing. The second and fourth casings have easy access, and the third is not too bad. The first is a bit of a problem, and the fifth is difficult to do well. The paddle rack mounting posts can be used as a rest, with your finger gently holding the bit down. For first you would have to hold the bit in that "rest" and then flex it up and over the outer runner enough to avoid marring the finish, so not touching at all.
I should add that my set of 12" aircraft #37 and #40 bits are only fluted the first inch, with the remaining 11" being solid rod, and, therefore, safe for the finger pressing it into the rest provided by the paddle rack posts.

Last edited by the elephant on Sun Dec 20, 2020 10:02 am, edited 1 time in total.
-
the elephant
- Posts: 3778
- Joined: Thu Aug 13, 2020 8:39 am
- Location: Yazoo City, Mississippi (stop laughing!)
- Has thanked: 2187 times
- Been thanked: 1586 times
Re: Venting rotary valve?
Not my cup of tea, but if there is not leak and enough air can move quickly enough then it is a success. Every tech has their own way of doing this sort of work. This is how *I* do it, along with my reasoning for how I do it. I might add to my reasoning that I do three small holes as this acts as a filter to larger trash from entering the casing. One big hole invites gritty crap into a place where gritty crap causes serious issues. If I could drill ten even smaller holes I would, for this very reason, but I am limited by whatever tools I have at hand, and I cannot find 12" drills in any smaller diameter. Plus, at this size range, the smaller the hole the harder it is to drill with really long bits, in my experience.matt g wrote: ↑Sun Dec 20, 2020 9:15 am @the elephant, thanks for those photos.
My 188 was vented like those small single holes in your first photo. They did wheeze a little, but it wasn’t really noticeable. All five of mine were vented when I only needed to move first most of the time.
I believe venting can be done with the casings in place, but it’s a higher risk.
Edit:
Wade, your stacked holes idea got me to thinking. If a tech were to drill the upper and lower holes only, they could use a slightly larger bit while minimizing risk of leak due to the curvature of the valve ports. The single point dead on center is the highest risk. Using the poorly vented valve as an example, if the vent could be moved to where it’s aligned just inside the valve knuckle, there would be no leak in the photo you have there since the valve port would’ve curved away at that point.
Edit 2:
This photo shows, in the red highlighted areas, where that larger port could’ve been a bit off center (not to the extent of the highlights, they are just there for alignment purposes) and not created a leak with a degraded bumper.
I like your idea. If you ever do this please share a writeup and photos with us, Matt!
-
jonesbrass
- Posts: 188
- Joined: Tue Aug 25, 2020 6:20 am
- Has thanked: 65 times
- Been thanked: 29 times
Re: Venting rotary valve?
Perhaps this should be a separate thread, but what about venting pistons? Is it trickier to do? Same pitfalls, right?
Sent from my iPhone using Tapatalk
Sent from my iPhone using Tapatalk
Willson 3050S CC, Willson 3200S F, B&S PT-10, BMB 6/4 CC, Yamaclone JFF-303
-
the elephant
- Posts: 3778
- Joined: Thu Aug 13, 2020 8:39 am
- Location: Yazoo City, Mississippi (stop laughing!)
- Has thanked: 2187 times
- Been thanked: 1586 times
Re: Venting rotary valve?
I have not had the stones to drill holes into piston walls. I am not sure how you clamp the piece down without marring or deforming the piston wall or how you prevent the drill bit from walking. I am thinking drill press, leather pad in the vise, and very low pressure on the Advance lever.
I have a set of BEAUTIFULLY vented pistons. I also have one that shows evidence of the drill bit walking on one of them. I am not willing to try this job until someone really good at it teaches me some things first.
Also, structurally, the vents on pistons can be pretty large compared to those on rotary valves. Generally, smaller is better, but the issue with lots of air moving in or out under high pressure (moving the slide very quickly) is solved with a single, larger hole, where a few smaller holes work better with a rotary valve. The hole can be as large as the piston bottom vent hole as that is the limiting factor. (The upper hole is usually smaller than the one on the bottom.)
-
matt g
- Posts: 2601
- Joined: Thu Aug 13, 2020 10:37 am
- Location: Southeastern New England
- Has thanked: 269 times
- Been thanked: 559 times
Re: Venting rotary valve?
@the elephant, I have not the stones to try any venting! I was just observing the geometry at play and thinking about the design trade offs.
If I were to come into possession of a rotary valve horn again (both of mine have vented pistons), I’d probably hunt out a competent tech and have the upper and lower of the approach you’ve used with a (very) fine bit.
My reasoning, for what it’s worth:
-Margin of error is reduced as mentioned above
-Having two holes introduces redundancy if needed (crud clogs)
-Keeping the holes small reduces crud clogs (as mentioned in a prior post I’ve had to clear these out)
-Having the two might be useful as upper and lower oiling points
-Two may be sufficient venting for most valves, maybe first would need the center added since it would see the most usage
Thanks again for sharing the triple-vented photos. It sparks some interesting ideas in a rather well-hashed-out topic.
Dillon/Walters CC (sold)
Meinl-Weston 2165 (sold)
Meinl-Weston 2165 (sold)
-
matt g
- Posts: 2601
- Joined: Thu Aug 13, 2020 10:37 am
- Location: Southeastern New England
- Has thanked: 269 times
- Been thanked: 559 times
Re: Venting rotary valve?
The one thing that is easier from my understanding is that a set of piston valves with some light mileage actually provides a “target” in the form of some light discoloration on the piston where the vent should be made. Other than that, based on similar concerns as Wade, I’d stay even further away from venting pistons.jonesbrass wrote: ↑Sun Dec 20, 2020 10:12 am Perhaps this should be a separate thread, but what about venting pistons? Is it trickier to do? Same pitfalls, right?
Sent from my iPhone using Tapatalk
Sidebar:
Have manufacturers offered this as an option on their horns in the past? I was told my 188 was factory done. That horn was about 15-20 years hold by the time I got ahold of it. And the prior owner thought that was the case. The job was top notch and could’ve been factory, but the horn lived in Los Angeles during its early years and there were many skilled techs in that area at that time (late 70s to the early 80s).
I’d think that offering vented valves as an up-charge from the factory would provide additional profit for them and the resellers. The factory can do this in house when it’s easiest. AND, unlike some other factory options that used to be on tubas, vented valves have a practical use.
Dillon/Walters CC (sold)
Meinl-Weston 2165 (sold)
Meinl-Weston 2165 (sold)
-
windshieldbug

- Posts: 538
- Joined: Thu Aug 13, 2020 1:02 pm
- Location: 8 vb
- Has thanked: 345 times
- Been thanked: 96 times
Re: Venting rotary valve?
matt g wrote: ↑Sun Dec 20, 2020 10:58 am Have manufacturers offered this as an option on their horns in the past? I was told my 188 was factory done...
I’d think that offering vented valves as an up-charge from the factory would provide additional profit for them and the resellers. The factory can do this in house when it’s easiest. AND, unlike some other factory options that used to be on tubas, vented valves have a practical use.
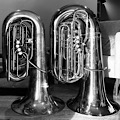
My 184 4U CC came from the factory with vents, so they WERE doing it back in the '70's!
- Miravents.jpg (195.26 KiB) Viewed 4540 times
Last edited by windshieldbug on Mon Dec 21, 2020 12:29 pm, edited 1 time in total.
If it’s tourist season, why can’t we shoot them?
-
Doc

- Posts: 2476
- Joined: Thu Aug 13, 2020 9:48 am
- Location: Downtown Browntown
- Has thanked: 850 times
- Been thanked: 768 times
- Contact:
Re: Venting rotary valve?
I have vented two tubas, and, despite being VERY apprehensive, it worked out just fine. I followed instructions and took my time. The biggest pain was getting the hole started without the bit sliding around and gouging all the lacquer. Patience is your friend. Everything else went according to plan. I haven't yet vented the Hagen, but I need to bite the bullet and get it over with.
Welcome to Browntown!
Home of the Brown Note!
Home of the Brown Note!
-
bloke

- Mid South Music
- Posts: 20752
- Joined: Thu Aug 13, 2020 8:55 am
- Location: western Tennessee - near Memphis
- Has thanked: 4289 times
- Been thanked: 4555 times
Re: Venting rotary valve?
Over the years, I’ve slightly altered how I do these:
I drill them slightly above or below center - up and down, and slightly off center - left to right, so that the hole is covered a little bit earlier in the stroke.
They don’t look as “pretty“ as if they were centered, but I believe it’s a little bit better.
I drill them slightly above or below center - up and down, and slightly off center - left to right, so that the hole is covered a little bit earlier in the stroke.
They don’t look as “pretty“ as if they were centered, but I believe it’s a little bit better.